Search is currently unavailable. To use search functionality, please accept cookies in your preferences.
Popular Searches: POP Containers
The Finer Points of Knife Sharpening
Most of us use our kitchen knives regularly. But when it comes to sharpening them? Not so much. And yet a sharp knife is much safer than a dull one. Here, everything you need to know to safely sharpen your knives at home.
19 min read

Holly Hays
Jan 15, 2024
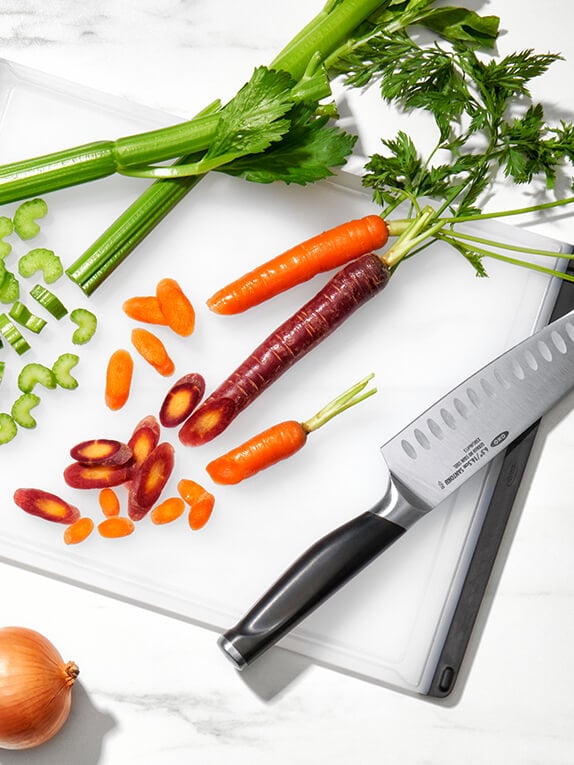
Watch enough cooking shows and videos and you know: A beautifully sharpened knife is worth its weight in finely chopped onions. With a sharp blade—one that bites easily into whatever you’re prepping—your slicing job is done in no time. With slight pressure, you’re able to cleanly cut into the item at hand.
Now imagine your knife blade is dull… You press down into that onion only to have the blade glance off the skin, putting your fingers and anything else nearby at risk of getting cut. Not only is your job harder and less efficient, but it’s also scarier when you’re working with a dull knife. And at the end of the day (and the beginning and around lunchtime) all of us—and our fingers—deserve a properly sharp tool that can handle cooking tasks quickly and safely.
This is why it’s well worth your time to take a few minutes to restore your knives to their sharpest form. It’s a task few of us regularly tackle, even though we know that we should. But here’s the good news: It’s easy to sharpen knives right at home with the proper tools and techniques. Here, we’ll cover both and arm you with the knowledge you’ll need to feel confident tackling this on your own.
Tools to Sharpen a Knife
Sometimes just the idea of sharpening a knife feels a bit intimidating. Pulling a blade across a whetstone or honing rod at the perfect angle and the perfect speed sounds a little intense, right? But you don’t need to be a professional chef to conquer this task. And it actually doesn’t have to be that complicated. You can put a razor-sharp edge on your trusty kitchen knives with a few basic tools that are simple, straightforward to use, and budget friendly. How’s that for peace of mind? Here’s what you need:
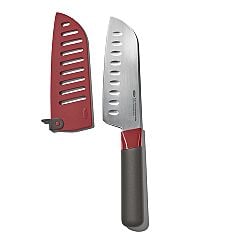
- A manual or tabletop sharpener
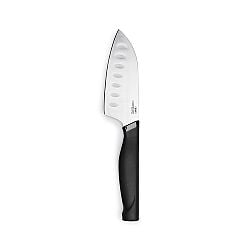
The easiest, most approachable way to sharpen a knife: A tabletop sharpener. This handy, affordable kitchen tool sits on a flat surface so you can securely press down on it while you sharpen. It has a handle on one side and multiple slots on the other; the slots are filled with abrasive material that help sharpen and hone a knife. OXO’s Non-Slip Knife Sharpener has two slots, filled with Tungsten Carbide and Ceramic sharpening rods; one slot is for sharpening the blade, the other is for honing, or straightening and realigning, it. As you pull a knife through the sharpening groove, the rods shave off small bits of the knife’s metal edge, fine-tuning and sharpening it. Finish the knife by honing it. - Dull knives
The sharpener above works grandly with the following knives, but it can handle any stainless-steel knife with a non-serrated edge:- Japanese-style santoku knives. These knives are constructed with air pockets or indentations along the blade that help prevent food from sticking to the knife while chopping. They come in mini and large sizes, and are especially good for cutting fish, meat, and vegetables.
- Chef’s knives. These functional workhorses can tackle just about anything: slicing larger fruits, vegetables, and cuts of meat as easily as they mince herbs, garlic, and more.
- Paring knives. These petite knives are ideal for peeling and finer knife work, especially trimming and slicing smaller items, such as strawberries and Brussels sprouts.
- NOTE: Serrated and ceramic knives are best sharpened by the pros. Serrated knives are tricky because their many tiny grooves are difficult to access with an at-home sharpener. Ceramic knives are more brittle and breakable than stainless steel and, like serrated knives, can require more specialized tools to sharpen. (Learn more about the different types of kitchen knives and when to use them.)
- Damp cloth
This is for wiping the blade off after sharpening, removing any fine metal shavings or residue that may have built up during the sharpening process.
Get Sharp Fast Fact: What is Honing?
Over time, as you use a knife, the blade will develop tiny imperfections: minuscule bends, dings, and dents that keep the tool from working as well as it should. Honing straightens the knife out again, realigning the metal so it can cut cleanly and precisely. The process does not actually sharpen the blade but is still an important part of helping knives function properly. In fact, even if a knife is sharp, it’s a good idea to hone the blade whenever you’ve used it a lot to eliminate curves and keep the knife in prime slicing condition.
How to Sharpen Kitchen Knives
The beauty of using a tabletop sharpener is how easily and quickly it works its sharpening magic. Here’s what to do:
- Set up your knife sharpener. Slide open the sharpener (the OXO Knife Sharpener’s compact design allows the slots to slide into the handle for more convenient storage) and place it on a smooth flat surface, like a table or kitchen countertop. Hold the handle with your non-dominant hand—the sharpener can be used by both right- and left-handed people and its non-slip grip provides extra control.
- Position knife in sharpener. Center the base or heel of your knife in slot 1 (the sharpening slot). Tilt the knife point downward so the knife is positioned at a slight angle, with the tip down towards the countertop and the handle slanted up.
- Pull the knife through the groove. Pull the blade towards you through slot 1 in one slow, smooth motion, pressing down with firm, even pressure into the sharpener’s groove. After each stroke, end with the knife’s handle elevated slightly to make sure the entire length of the blade goes through the sharpener, heel to tip.
- Repeat. Repeat this motion—pulling the knife through the sharpening slot—three to four more times. The blade may start to glide more smoothly through the groove, or you may see small metal shavings falling off the knife; both are signs that the knife is getting sharper.
- Fine tune blade. After the blade is sharp, finish by honing it, a process that smooths out any tiny bends, curves, or other misalignments in the metal. To do this, center the knife in slot 2 (the honing slot) and pull the blade through in one stroke, using the same firm pressure and heel-to-tip method as before. Repeat two to four times.
- Clean the blade. Using a damp cloth, wipe the knife blade clean of any metal bits or residue that may have built up on the blade as it was sharpened. For more thorough cleaning, rinse the blade off with warm, soapy water. Dry the knife carefully before using or storing. (Blades left wet can rust.)
Get Sharp Fast Fact: How to Clean Your Sharpener
It’s best to clean your tabletop sharpener after each use to get rid of metal shavings and any other debris. To clean, wipe down the outside of the sharpener and around the slots with a damp cloth. Never completely submerge the sharpener in water. Dry with cloth or paper towel and store.

How Often to Sharpen Your Knives
Now that you’ve got the sharpening technique down, you need to make sure you’re keeping up with it regularly. But how often do knives need to be sharpened anyway? The answer varies a bit depending on how regularly you’re using them. If you use your knives…
- …Every day (or most days): Sharpen your knives several times a year — every two to three months is a good rule of thumb. If you’re often putting your knives to use slicing, dicing, and chopping meat, fish, veggies, and more, your knives will dull more quickly and need more frequent sharpening.
- …Every few days: Sharpening your knives one to two times a year will probably suffice for those who cut, chop, and slice less often. Your knives will likely hold their sharp edge longer, requiring less frequent sharpening.
But don’t just rely on timelines. Your knives will also tell you when it’s time. If you notice that your knife no longer easily cuts into sturdier foods like bell peppers, tomatoes, and onions, it’s time for a sharpening session.
For ultimate knife upkeep: Once every two to three years, it can be a good idea to have your knives professionally sharpened—even when you’re taking good care of them on a regular basis. The pros will return knives to their ultimate sharp, honed quality and give you a good foundation from which to work on a more daily basis.
Get Sharp Fast Fact: 50% of knife owners report using their knives three or more times per week.
The Best Way to Store Knives (to Keep Them Sharp)
If you’re like many people, your knives are clanking around in a utensil drawer, crashing into ladles, spatulas and whisks every time the drawer opens. It’s a sure way to dull the edges you worked so hard to sharpen. And it can be dangerous, too…your hand brushing against a knife blade when reaching for the tongs. Consider this your intervention. Rescue your knives (and hands) and preserve sharp blades with one of these storage methods:
- A protective sheath or knife cover. A sheath—or a protective sleeve—slides over a knife’s blade, covering it up and preventing it from getting dinged up or chipped if the knife knocks into other objects. If you store knives in a drawer, a sheath is a great way to protect them.
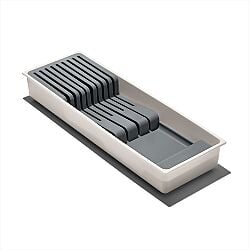
- A drawer organizer. A drawer organizer corrals knives neatly and safely in designated slots, keeping them from clattering around and allowing blades to stay sharp. The OXO Knife Drawer Organizer nests neatly inside a drawer and can store up to nine knives, four large and five small. Its non-slip feet keep the tray in place when the drawer is opened and closed.
- A magnetic strip. Mount these long metal strips to a wall in your kitchen. Knives’ metal blades securely stick to the magnet, keeping the tools in place and out of harm’s way. Store knives with handles down to make them easier to grab when needed. When you’re placing the knives on the magnet, approach with the flat side of the blade, rather than the edge, to avoid dulling the knife.
- A knife block. These thick blocks of wood sit on a countertop or shelf. Knives slide into deep, slim slots in the wood to protect blades and keep the tools separate from one another.
Get Sharp Fast Fact: Most people own a Chef’s Knife, but less than half have a knife sharpener. (That’s a scary amount of dull kitchen knives lurking out there!)
How to Care For and Maintain Your Knives
Knives well deserve their VIP status in your kitchen, and there are lots of ways you can help them last longer and stay in better, sharper shape. These dos and don’ts cover the essential knife-care basics.
- DO avoid knives coming into contact with other metal—like when you’re placing them back in kitchen drawers or the sink—as this can ding and dull the knife’s sharp blade.
- DO choose your cutting board carefully. Wood and plastic cutting boards are best as they provide a softer, more forgiving landing for knife blades during cutting and chopping. Cutting on glass or stone boards (such as marble) will dull a knife’s blade and may even break or chip it. And while you’re at it, make sure that cutting board is truly clean and sanitized. (It’s a good practice to reserve one cutting board to use when slicing fruits and vegetables and a different cutting board for preparing meat and fish. You can color code the boards to more easily tell them apart.)
- DO clean knives as soon as possible after using them so juices (especially acidic ones like from tomatoes, onions, lemons, and limes) and other food residues don’t start to corrode or rust the blade’s metal.
- DO handwash knives using mild dish soap and warm or hot water to remove any food bits and potentially dangerous bacteria. But…
- DON’T soak your knife. A knife’s blade can corrode if it spends too much time in water. Knife handles are vulnerable when wet, too. Handles can soak up excess water and have difficulty fully drying out; over time, the moisture can lead to bacteria building up where the handle meets the blade. Wood handles may also crack.
- DON’T put knives in the dishwasher. This is yet another scenario where the knife will be exposed to water for too long. Plus, the dishwasher’s high temperatures can damage a knife’s blade and handle, causing them to rust (the blade) and break down or crack (the handle).
- DO dry knives right away with a dish or paper towel and safely store. (See above for storing tips.) If you leave knives to air dry, you’re putting them at risk of rusting over time.
- DO get rust off knives by soaking them in a dish of white vinegar overnight or up to 24 hours. Remove from vinegar and scrub blade with an abrasive sponge or brush. Rinse and dry immediately.
- DON’T store knives loose in a drawer with other items. Keep knives safe and sharp with one of the storage methods mentioned above.
Now that your knives are sharp enough to make any chef proud—and you know how to keep them that way—it’s time to master your slicing and dicing techniques, no matter if you’re a beginner or a cooking pro. And while you’re fine-tuning your kitchen skills, here’s how to take care of your favorite pots and pans as well as your cookware and bakeware so all your kitchen tools are in their best form.
Shop This Article
Continue Reading


Shop This Article
Loading...