Search is currently unavailable. To use search functionality, please accept cookies in your preferences.
Popular Searches: POP Containers
How to Make Turkey Gravy Using a Fat Separator
Whether you’re roasting a chicken or a turkey, you can turn up the flavor by serving a delicious gravy alongside. A fat separator is an ideal tool to help. Here’s how to use it.
4 min read

OXO
Oct 17, 2024
Whether you’re serving up a roasted chicken (hello, cool weather) or a turkey (hello, holidays), including a flavorful gravy will instantly elevate the meal to extra delicious status. And when it comes to gravy, a fat separator makes the task go much more smoothly—literally— as the tool filters out solids to yield silky gravy results.
Read on for more about this handy kitchen tool.
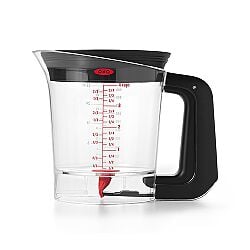
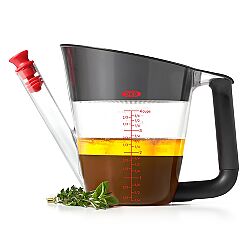
How Does a Fat Separator Work?
A fat separator looks a lot like a liquid measuring cup and is designed to separate fats from other cooking liquids. A strainer sits in the top part of the cup. When you pour pan drippings into the strainer, it filters out any solids. In the remaining mixture, fats rise (or separate) to the top. You can then pour out the juices, leaving the fats behind.
OXO makes two separator versions: this one has a spout towards the bottom of the cup so liquids can be poured out before fats. With the Good Gravy Fat Separator, squeeze the Separator handle to release liquids (but not fats) from the bottom of the cup.


How to Use a Fat Separator
- Remove any solids from the pan. Once your poultry has fully cooked, remove it from the roasting pan, along with any accompanying vegetables or other solids.
- Deglaze the roasting pan by heating it on the stove top. Depending on the size of your pan, you may need to use two burners. Once the liquid starts to bubble, scrape the pan to release the additional bits.
- Transfer all of the liquid to a fat separator. The strainer will catch any solids left behind. It’s important to separate the fat from the liquid so you can make a roux, which will be the base of the gravy. Roux is a mixture of fat and flour and the key to thickening sauce.
- Pour or release the cooking liquid into a bowl or measuring cup.
- Note how much fat you have left in your fat separator by using the measurement markings on the fat separator. Then pour the fat into a saucepan.
- Once the fat is heated, add equal parts flour. Whisk the fat and flour for about 1 minute to cook out the flour taste. You should be left with a nutty smell.
- Add the remaining cooking liquid from the fat separator and continue to whisk.
- Let it come to a boil while whisking. This will be the thickest point of the gravy. If needed, thin the sauce with stock. Once it reaches desired consistency, it’s ready to serve along with Thanksgiving dinner or whatever meal you’re prepping.


Fat Separator Substitutes
A separator tackles the dividing-juices-from-fats job most easily, but a few other methods can be used as well.
- A fat skimmer spoon looks like a shallow ladle with small holes. Skim it across the top of liquids to remove fats.
- Pour liquid into a plastic bag and allow fats and juices to separate. Trim off a small corner of the bag and let juices pour out. Fats remain in the bag.
- Pour liquid into a bowl or jar and allow fats and juices to separate. Use a baster to suck up juices (not fats). Alternately, cool liquids in the refrigerator and once fats have solidified, scoop them off with a spoon.
If this is your first Thanksgiving or other big meal, these tools, along with a separator, will be your most helpful kitchen sidekicks. Already a hosting pro? Check out this method of stepping up your poultry game!
Additional reporting by Holly Hays.
Shop This Article
Continue Reading


Shop This Article
Loading...